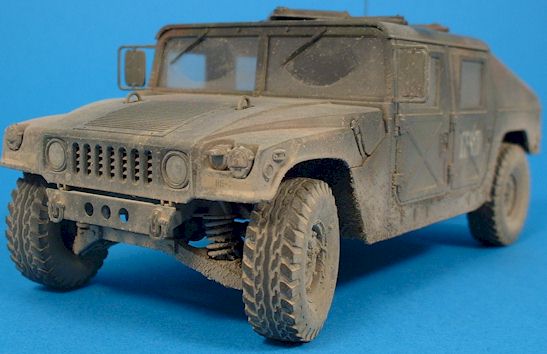
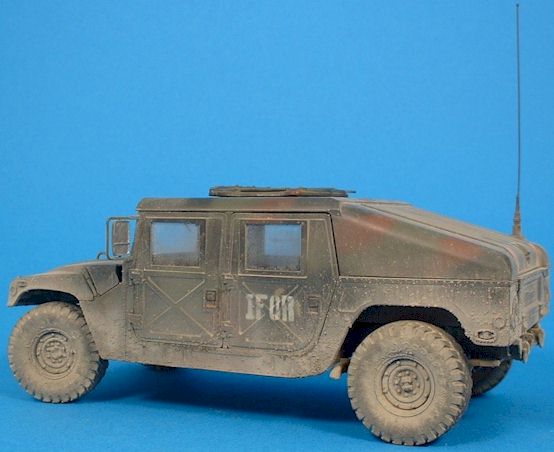
The all-new Tamiya kit is built out of the box
by Anders Isaksson
Background
The Humvee was designed by AM General as a contender in the competition for designing and manufacturing a multi-purpose wheeled vehicle for the U.S. Army. AM General was awarded with the contract to produce what was to become the Humvee. When starting to replace the M151 Ford MUTT in 1985 the Humvee brought cross-country improvements from a longer wheel base with better ground clearence together with such features as power brakes and power steering.
The kit
This article is not intended as a full-blown review of the kit but rather a  summary of my observations from building the Tamiya Humvee.
The Humvee has breen available in 1/35th scale since the late 1980’s and modellers have had a number of different versions from Italeri, Academy, Tamiya and AFV Club. While this may sound like a good selection the truth is that all these kits originate from either the Italeri or the Academy kits. True, both these kits will produce a decent model of the Humvee but they still have some room for improvements. In my opinion the major letdown is the rendition of the wheels and tires, they simply fail to capture the look of the real thing.
So how does the new Tamiya kit compare to the excisting kits out there? In short: the Tamiya Humvee leaves its competitors in the dust. While I am not too knowledgeable on the Humvee and its many versions I do think that Tamiya has produced the first first model that fully captures the look of the Humvee.
Highlights in the kit include fine detailing of the chassis and drive train, great looking synthetic rubber tires and an overall excellent engineering and fit of parts. I was first a bit sceptic to the rubber tires but I must admit that these really look the part and are clearly superior when compared to both the Academy and Italeri tires as well as those available in resin from the aftermarket manufacturers. Furthermore the kit offers two styles of rearview side mirrors, two different hood air intake grills as well as the choice of extended air intake and exhaust for deep wading.
However, as good as the kit is there are certainly a few areas that fall short. On the downside we can note that only early style radio as well as early pattern wheels and tyres are supplied in the kit. These features are more typical of a vehicle used in the ‘80s and up to Operation Desert Storm of the early 90’s.
Also, the overall level of detail in the interior is a bit lower than could be expected. Prominent details that are simply missing are a set of pedals for the driver along with the cabin heater on the passengers side. Apart from a single M2 0.50 machine gun no additional gear is provided for stowage, leaving the cargo area a bit empty.
A few recent Tamiya kits have included a number of details in  photoetched metal where needed. The protective screen for the extended exhaust pipe should have been a prime contender for this kind of photoetched enhancement but no metal is provided by Tamiya. This screen is instead made up from two plastic parts which should be difficult to mate and clean up properly without destroying the surface mesh detail. Too bad.
So far there has not been a perfect scale model produced by any manufacturer so what is really the problem? Well, despite the negatives all could still be fine if it was not for the fact that the shortcomings of Tamiya’s Humvee is to be balanced against a rather high price tag, not too far below their Tamiya’s newer tank kits. Considering the price of the Humvee I feel there should be a bit more plastic to greet you when opening the box.
Construction
As this was going to be an out of the box project 
the construction of the kit was a rather quick affair. With typical Tamiya engineering and logical assembly sequences I had the chassis and body ready for painting in just around three hours. There are no pitfalls to assembly so everything should run smoothly.
Note: Tamiya used multiple moulds to accurately capture the shape of the hood. This method produce a pair of tiny mould separation lines running along the hood. Since these lines are rather difficult to spot while the hood is unpainted I would advice to spend some time sanding out these lines or they will show up after painting. Just be sure to leave the tiny recessed line running around the grille and headlights, it is supposed to be there.
The windows must be installed before the roof is attached to the upper body. In order to make painting easier and avoid having to mask any windows I left the roof as a separate piece during the entire painting phase. However, the doors were glued in position before painting was begun. The roof was not attached until needed for the final stages of the weathering. Speaking of the roof, in his recent TMMI article (issue 100) on the Tamiya Humvee editor Marcus Nicholls points out that the upper rear corner of the roof where it meets the rear door actually should look more squared off. I did not notice this error when building my Humvee, but with a few pictures of this area and a file it should be a fairly simple operation to correct this area of the kit.
As always I wanted to include the human element. Tamiya provides two figures with their kit, one sitting driver and one figure designed to be standing through the roof hatch to crew Mk 19 Grenade Launcher. The driver figure was glued together and painted using Vallejo colours. Considering how little would be visible I did not spend more than around half an hour to finish the driver before letting him hide away in the drivers seat.
I did not install the Mk 19 grenade launcher and decided to keep the roof hatch closed in order to speed up assembly and get ready for painting.
Paint and markings
Painting was carried out using the Tamiya NATO acrylics. The base for the entire vehicle inside and out was XF-67 NATO Green. The patterns of XF-68 NATO Brown and XF-69 NATO Black were airbrushed free-hand using heavily thinned paint and high air pressure. I tried to make the demarcation lines as tight as possible and followed the standard pattern depicted in the instructions.
I did not bother with any washes or dry-brushing and instead concluded the painting by applying a gloss coat using Polly Scale in preparation of markings and weathering.
The kit water slides were used for the unit markings. The decals were trimmed of their clear carrier film and applied with a little Micro Sol and Set as assistance. I skipped the small stenciling as these are impossible to trim of excess film. Besides, the effect of mud and dust would hide these markings anyway.
The IFOR markings were applied using the Eduard paint masks and I while they look better than water slides I found them difficult to get to conform over the ribs of the doors. The resulting soft look produced by the masks got me a little worried but as pointed out by fellow modellers these markings looked rather rough in reality so in the end I decided the soft look would not be a major problem but rather realistic instead.
Finally the windows and light lenses (painted in appropriate Tamiya clear colours) were installed and the roof was attached to the upper body, making the model ready for weathering.
Weathering
Time for the fun. For this project I wanted to try a different recipe for mud. 
I used Liquitex Texture Gel for the basic mud. Texture Gel comes in a variety of mixtures and the one I used is called Ceramic Stucco.
This Gel can best be describes as white glue mixed with very fine sand and although I suspect something similar can be mixed using home appliances I wanted to try the Liquitex product.
But first things first, here are the basic steps I followed to achieve the weathered look I wanted:
- An overall irregular coat of pigment powders was mixed with Humbrol thinner was applied to the entire model. My desired coulour was a 50/50 mix of Mig Productions Europe Dust and Light Dust pigment powders. (Note: A mix with Tamiya Thinner was used on wheels to not risk damaging the rubber tires.)
- When dry the model was treated with a dry paintbrush to remove all excess pigment and leave only a thin residue on all surfaces and in recesses.
The mud mix was splattered on the lower areas using various old paintbrushes as well as a toothbrush. It was a bit difficult to control exactly where  the mud went but in the end I was happy with the results.
Mix of pigment powders and Tamiya Thinner was airbrushed along the lower areas to tie everything together. I tried to keep the airbrushed applications as restrained as possible to not cover up the splatter effects and flatten the details.
Further streaks and blotches were achieved by working the surface with a dry paintbrush along the lower areas of the model. A few areas aroud the doors and handles had the mud and dust nearly removed to simulate scuff marks made by the crew when entering and leaving their Humvee.
Conclusion
This was a fun build and I am very happy with how the mud and dust effects turned out, especially when considering the limited time (around 12 hours in total) I put into this project. The Tamiya Humvee is an excellent kit and it easily produces the best 1/35th scale Humvee on the market. As I write this Tamiya has just released the M1046 TOW Humvee and this kit is very similar to the basic M1025 Humvee. New features include the winch for the front, armoured doors as well as improved interior detail on the rear door. Also supplied is a little extra stowage.
I have plans on building another M1025 Humvee soon, but this time with doors and rear hatch removed as often seen on Humvees operating in a hot climate. However, this configuration will definitely require more interior details to be added.
(Not mentioned by the author, his Humvee model won a Commended award at the 2003 Euro Militaire – Ed.)
This article was originally published in IPMS Stockholm Magazine in October 2003.


