Finishing Tamiya’s kit as a Vietnam War veteran
by Anders Isaksson
History
With its basic design dating back to the M26 Pershing of WWII, the M48 Patton medium tank was primarly developed from the M47 General Patton. Serving with both Army and USMC units, the M48 saw extensive use and was produced in numerous variants. While the M48A2 powered by a gasoline engine was the first version used in Vietnam, the diesel-powered M48A3 was the most numerous tank employed by the United States during that conflict.
Construction
Tamiya’s kit of the M48A3 is quite old but still produces an accurate model. The main shortcomings of the kit are the somewhat thick mouldings of the smaller parts and the simplified canvas cover of the main gun. As far as I can tell the basic dimensions are accurate, but I have not measured anything so please do not take my word for it.
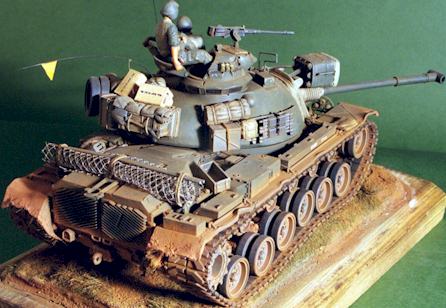
A few improvements were made to the kit, like adding detail to the canvas cover using Milliput as well as adding a cover to the search light from thin plasticard. I also modified the suspension to make it look like the tank is travelling across uneven ground. This adds interest and is a quite simple modification, only requiring repositioning the individual suspension arms.
Looking at photographs of Pattons ”in country” I noticed that the fenders seemed to take a lot of beating. They were often dented and it was not uncommon to see a section or two of the fenders missing.
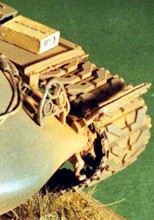
To add this this feature to my model a candle was used to heat and bend the edges of the fenders, making sure to make dents along the entire side of the tank and not just to the front and rear. On the left side I removed the entire front section, but I let the fender support remain in place. I had to add a few pieces of plasticard to the remaining fender and the support to make the area look convincing. The left lamp guard also recieved a little abuse and the headlight was drilled out to simulate a missing lens. Two short pieces of thin brass wire were glued to the empty headlight to simulate a broken bulb.
Paint and decal
The finished model was painted with a mixture of olive drab and matt black Tamiya acrylics. Once completely dried it recieved a light wash of diluted raw umber oil color. After the wash had dried the model was dry brushed using a mixture of Humbrol olive drab and light gray.
The tires of the road wheels were picked out with Humbrol matt black mixed with a little dark gray. The rubber portions of the tracks were painted with the same color and the connectors and guide teeth were painted Humbrol gun metal.
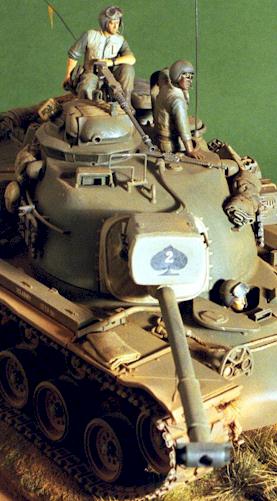
The only markings applied to the model were the unit numbers on the side of the fenders and personal markings on the searchlight cover and gun barrel. To eliminate the problems with applying wet decals I used dry transfers taken from the Verlinden Vietnam Armor set.
Weathering
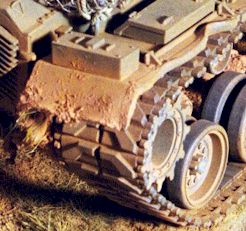
I wanted to simulate the effect of the characteristic red mud found in many areas of Vietnam. Weathering was begun by adding a mixture of waterbased putty, white glue, some redbrown water color, short pieces of elk hair and a little static grass to the underside and running gear, making sure not to cover too much of the detail. The result looked like dried cakes of mud with pieces of grass in it.
I then mixed a red brown color using Tamiya and Humbrol acrylics. This mixture was heavily diluted and airbrushed to the lower portions of the model including the tracks. I finally added scratches and general ”wear and tear” using Humbrol aluminium mixed with a little raw umber oil color.
Final details
At this stage everything was put together and the crews personal gear was added to the model. Various crates, cardboard boxes and rucksaks were taken from Verlinden and Italeri. A few rolled and folded tarps were made from pieces of fine silk fabric. An extra spare wheel (spare spare wheel?) came from In Country Hobbies. The empty wooden crate on the engine plate was scratchbuilt from strips of bass wood.
The crew is a mixture of resin parts from the Vietnam Tank Crew made by Verlinden and plastic parts from the U.S. Marines, Tet Offensive 1968 from Dragon. The driver is all Verlinden while the gunner and commander uses Dragon bodies together with the Verlinden heads. The left arm of the gunner was modified with Milliput to make rest on top of the open hatch. The right arm was originally naked and recieved a Milliput sleeve to make it conform to the rest of the figure’s clothing. The final detail was to add a pair of sunglasses made of plasticard and paper.
The two antennas were made of stretched sprue and attached to the turret with superglue. Inspired by photographs I added a small triangular flag made of yellow paper to one of the antennas. This antenna was then folded backwards, using a short piece of thin nylon thread to tie it to the rear stowage bin.
The final stage was to apply redbrown pastel powder to the entire tank. This complements the previously airbrushed coat of red brown acrylic and makes everything blend together. Black powder from a coal pen was applied to the rear engine grills to simulate exhaust residue and my Patton was complete.
The base
I initially had this model in mind for a diorama but after completion I decided to scrap my idea and mount the tank on a simple base instead. Starting with a suitable wooden base I modelled the terrain to conform to the tank suspension, using pieces of styrofoam to achieve the desired contour. This was then covered in water based putty mixed with white glue and colored with acrylic brown. Fine sand and small stones was sprinkled in the still wet mixture and the surplus was blown off. An extra length of vinyl track (I believe it belonged to Tamiya’s M60) was used to make impressions in the groundwork to simulate the tracks left from the tank.
After the mixture had dried I airbrushed the base with a lighter shade of brown using Tamiya acrylics. Short grass was glued to the base using static grass and lengths of elk hair was used to simulate tall grass. The grass recieved a light dusting of some suitable green acrylic color and the base was then left to dry.
With everything completely dry I attached the model to the base. Following Shep Paine’s advice in his book on building dioramas, I used a screw and bolt to secure the tank to the base as well as to make sure the wheels and tracks conformed to the uneven ground. Done!
This article was originally published in IPMS Stockholm Magazine in October 2000.

